A poster survives shipping or it does not, and the tube is what decides. Ship a 24-by-36 print in a flimsy tube that is barely wider than a broom handle and it arrives creased, curled, or crushed at one end. Match the diameter, wall, and closures to what is inside and the same print shows up flat and ready to frame. If you are sending artwork, blueprints, or a run of branded prints to customers, here is how to spec a mailing tube that protects the contents and keeps postage in check.
Round or triangular: start with the shape
Round tubes are the default for a reason. A cylinder distributes crushing force around its whole surface through what packaging engineers call the arch effect, which gives round tubes excellent resistance to being stepped on or stacked under heavier parcels. The trade-off is that they roll, which matters on a conveyor and on a doorstep. Triangular and square tubes solve the rolling problem and stack flat, so they travel well through automated sortation and sit tidily on a shelf, at the cost of slightly lower crush resistance at the corners. For most posters and prints a round tube is the simplest strong choice; reach for a triangular profile when stackability or a premium retail look is the priority.
Picking the right diameter
Diameter is the spec people underestimate. Too narrow and the print takes on a tight curl memory that fights you every time you try to flatten it, and coated or glossy stocks can crack or delaminate when forced into a small radius. The common guidance is a 2-to-3-inch inside diameter for a standard 24-by-36 poster, with 3 inches preferred to reduce curl and protect the ink. Larger prints and fine-art papers want 3 to 4 inches, and canvas or textiles need 3 to 5 inches because thicker materials simply cannot be rolled tight. Documents and small prints up to about 18 inches wide are fine in a 1.5-inch tube.
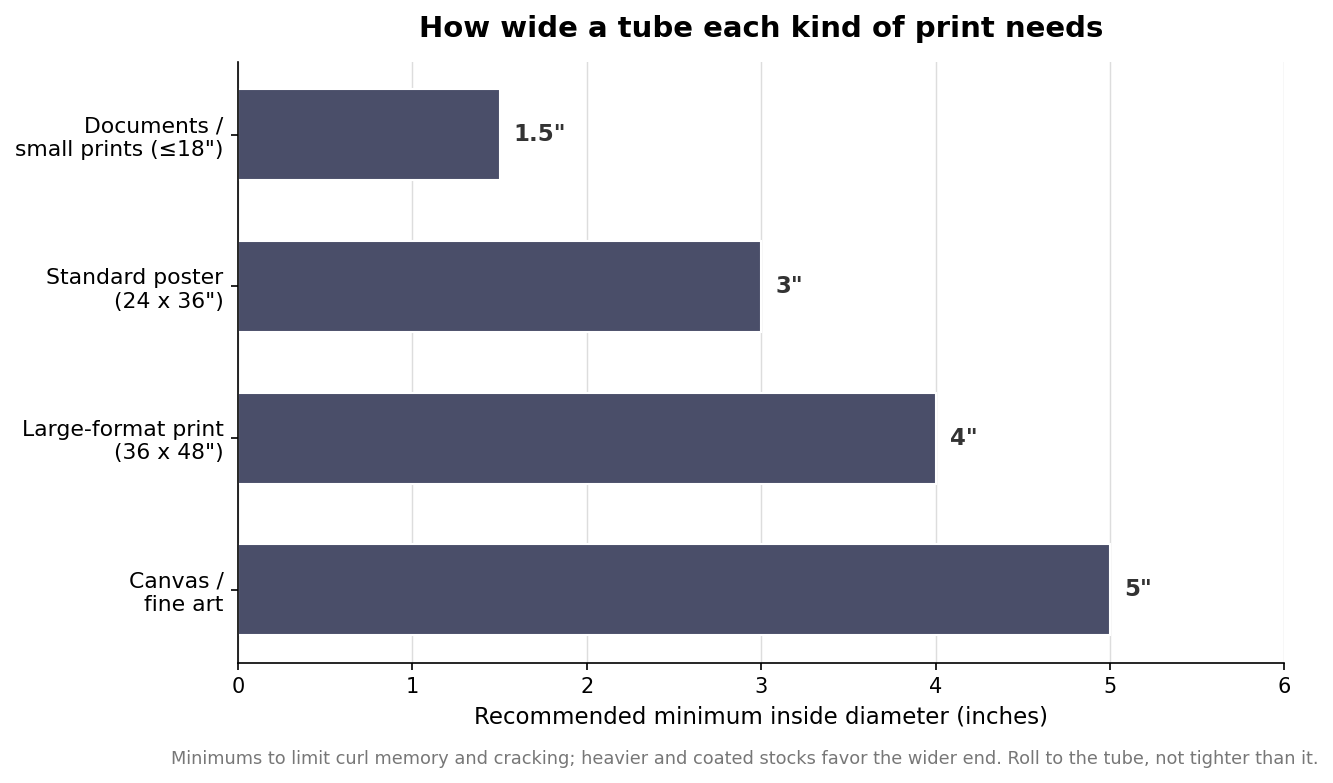
The rule of thumb behind the chart is to roll the print to the tube rather than to the tightest cylinder you can force, and to size up whenever the paper is heavy, coated, or valuable. A slightly wider tube costs a little more and takes a little more shelf space, but it is cheap insurance against a print that will not lie flat.
Wall thickness maps to the job, not the look
Two tubes of the same diameter can be worlds apart in strength. Wall thickness is where that difference lives, and it should track the value of the contents and how far they are traveling. Lightweight walls around 0.060 to 0.080 inches are fine for local delivery and inexpensive prints. Standard e-commerce shipping sits around 0.080 to 0.120 inches. High-value pieces and international routes, which see more handling, call for 0.120 to 0.180 inches, and industrial or heavy-duty applications go thicker still.
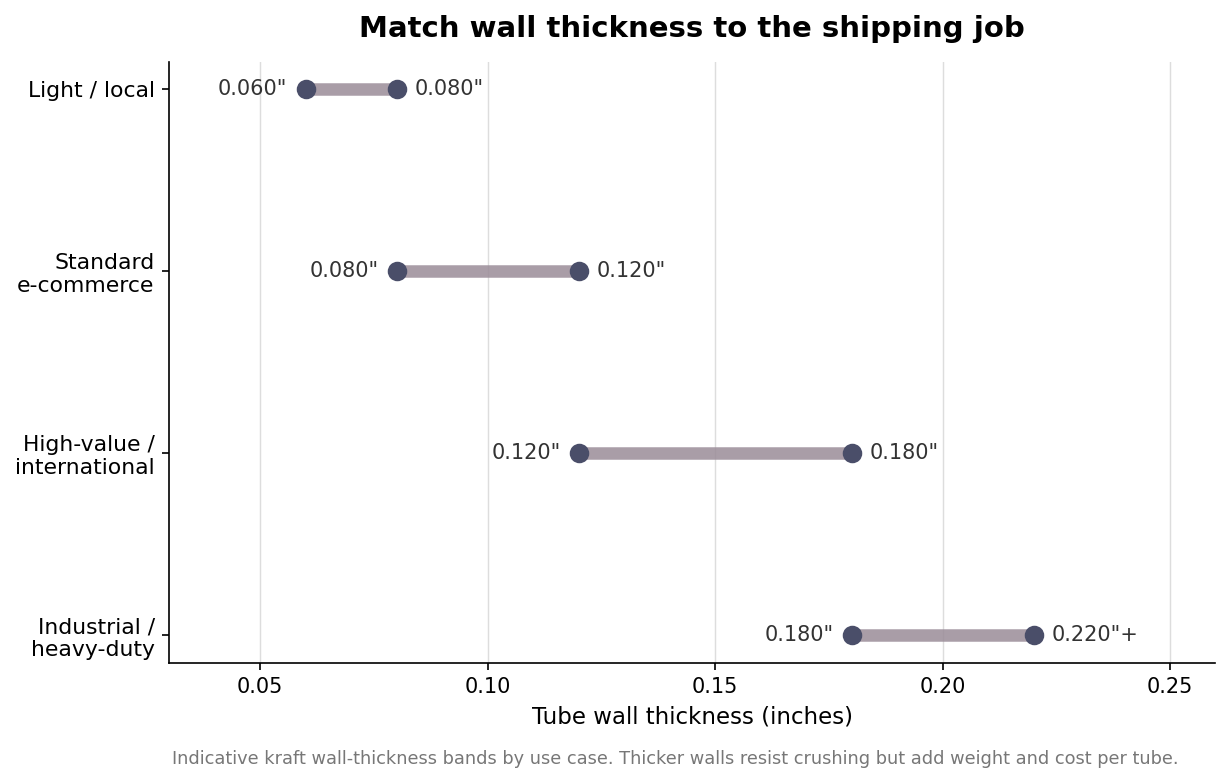
Thicker walls resist crushing but add weight, and weight is what you pay to ship, so there is a real cost to over-building. The goal is to buy just enough wall to survive the route the tube actually travels. If you are shipping a mix of cheap posters locally and signed prints across the country, it is often worth stocking two wall grades rather than forcing one spec to cover both.
Length, closures, and the rules that affect cost
Cut the tube close to the rolled print, not far beyond it. A 24-by-36 poster typically ships in a tube around 38 inches long, giving a little room past the print without leaving a long empty section that can collapse. Carriers also care about proportions: a widely cited postal guideline is that a tube’s length should not run much more than about ten times its diameter, since a long, thin tube behaves like a whip and jams sorting equipment. Treat that as a practical ceiling rather than a target.
Closures are where cheap tubes fail. End caps come as friction-fit plugs, twist-and-lock designs, and stapled or crimped metal ends, and the test for all of them is simple: the cap has to seat deeply into the tube so it cannot pop out under pressure. A cap that only perches on the rim will work loose in transit and let the print slide out or take on moisture. On the postage side, tubes do not qualify for flat-rate boxes, so pricing follows normal weight-and-zone rates; for light prints under about 13 ounces the most economical routes are usually the ground and lightweight package services rather than any tube-specific product. Weigh a packed sample before you commit to a size, because a heavier wall can quietly bump you into the next rate.
Rolling and packing so it arrives flat
How you load the tube matters as much as the tube. Roll the print loosely to the widest diameter the tube allows, and protect the printed surface with a wrap of glassine or clean kraft so nothing scuffs the face during the ride. Many shippers roll the image toward the inside to shield the surface, but the more important habit is simply not rolling too tight. Add soft end padding if the print is shorter than the tube so it cannot shift and telescope, cap both ends firmly, and tape the seams. For a branded unboxing, this is also where a custom-printed tube earns its keep: the same cylinder that protects the print can carry your logo, a pattern, or a message on the outside without changing any of the structural decisions above.
Spec the shape, diameter, wall, and closure to the print and the route, pack it without forcing the roll, and a mailing tube turns shipping a poster from a gamble into a routine.